Silicon Labs EFR32BG22 Developer Setup
This walkthrough will help you set up the Swaralink BLE Platform middleware for development our API. From cloning the Swaralink BLE git repo to installing the Integrated Development Environment (IDE) to begin developing with the Silicon Labs EFR32BG22 device family.
Please be aware that the following guide assumes you are using Windows. The exact steps or instructions may be slightly different for Mac OS and Linux.
Note: To complete the full build process, you will need to obtain the swl_periph middleware library from Swaralink Technologies. The library will be provided upon execution of a license agreement with Swaralink Technologies. For more information on obtaining a license, please contact swaralink Technologies at info@swaralink.com.
In the meantime, feel free to go through the remainder of the setup and application guide to understand the process of building a project and to get a walkthrough of the code. You can also browse around the SwaraLink Demo project source code and take a look at our API in the header files.
Clone the Git Repo
First, to get access to the Swaralink BLE Platform you must begin by cloning our git repository, which is located here:
SwaraLink swl_periph repo on Github
Using Git Bash, or any other Git client, clone the repo using the following command:
git clone git@github.com:SwaraLinkTechnologies/swl_periph.git
You can clone the repo anywhere on your local hard drive; the only restriction is that you do not have any spaces in any of the directory names. So for example, cloning to "C:\swl_periph, "C:\git\swl_periph", or "C:\development\ble\swl_periph" would all be acceptable options.
For the remainder of this documentation, we will assume that you cloned the repo to the directory "C:\git\swl_periph". If you chose a different location, be sure to adjust the instructions accordingly.
If you don't wish to use Git, you can alternatively download the contents in a zip file. Go to our github repo page, click the "Code" button on the upper right, and select "Download ZIP" to. Once the zip file is downloaded the contents can be extracted the directory of your choice.
Drop in the Swaralink EFR32BG22 Library
In order for the platform code to build successfully, you will need the SWL peripheral library which is provided by SwaraLink under license. The swl_periph library holds the internal workings required for our API to work.
The .a file must be placed in the directory C:\git\swl_periph\swl_periph\lib\swl_periph_efr32bg22\ as instructed by the README file inside.
Project Setup Guide
Follow the listed steps to setup the IDE and the EFR32BG22 for development with the Swaralink API.
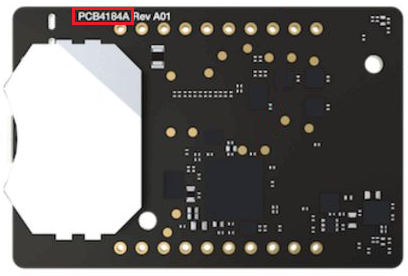
- Determine the board number of your EFR32BG22 DK, either version A or version B. On the bottom side of the DK, find the string in "4184A" or "4184B".
- Download the Simplicity Studio 5 (SSv5) IDE: Simplicity Studio v5.5.1.0.
- Plug in the Thunderboard EFR32BG22 via USB to your PC.
- Open "Environment Variables" on your PC and double-click "Path" under the User Variables table.
- Once the "Edit Environment Variables" page opens, select "New" and enter the path C:\SiliconLabs\SimplicityStudio\v5\developer\adapter_packs\commander. This assumes Simplicity Studio is installed directly onto the system C drive.
- Now go to C:\git\swl\swl_periph\platform\efr32bg22_silabs_sdk_4 and click the batch file generate_silabs_keys.bat to execute the Silabs commander encryption. The DK must be plugged into your PC at this stage so that your personally generated secure boot keys can be flashed onto it.
- At this point, move the generated app-sign-key.pem file to the following directory: C:\git\swl_periph\platform\efr32bg22_silabs_sdk_4\swl_periph_example_silabs_brd4184.
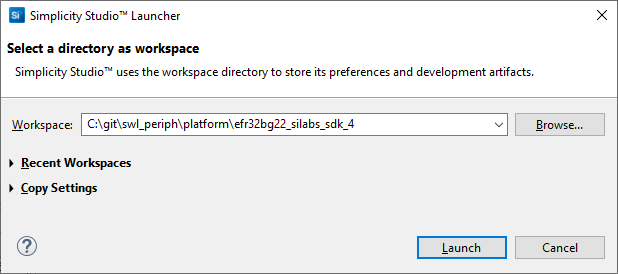
- Open SSv5 and create a new workspace under "File" -> "Switch Workspace", browse for or enter the path C:\git\swl_periph\platform\efr32bg22_silabs_sdk_4 then press "Launch".
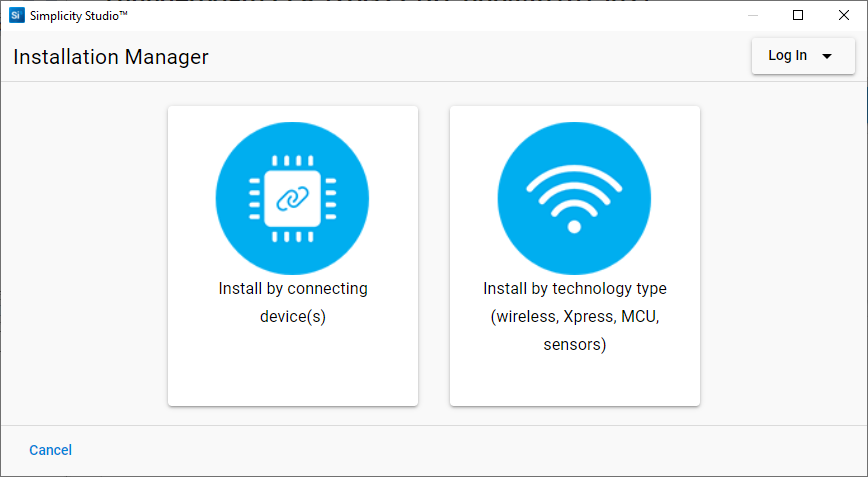
- After SSv5 relaunches, open the Installation Manger by clicking "Install" in the upper menu bar.
- Press "Install by connecting device(s)" and then select the Thunderboard EFR32BG22 DK. Proceed to to install with default options by choosing "Auto", to allow Silabs to download the recommended utilities.
- When SSv5 restarts, open the Installation Manager again and this time press "Manage installed packages".

- Navigate to the SDKs page, and click the ellipses (...) next to the SDK version number.
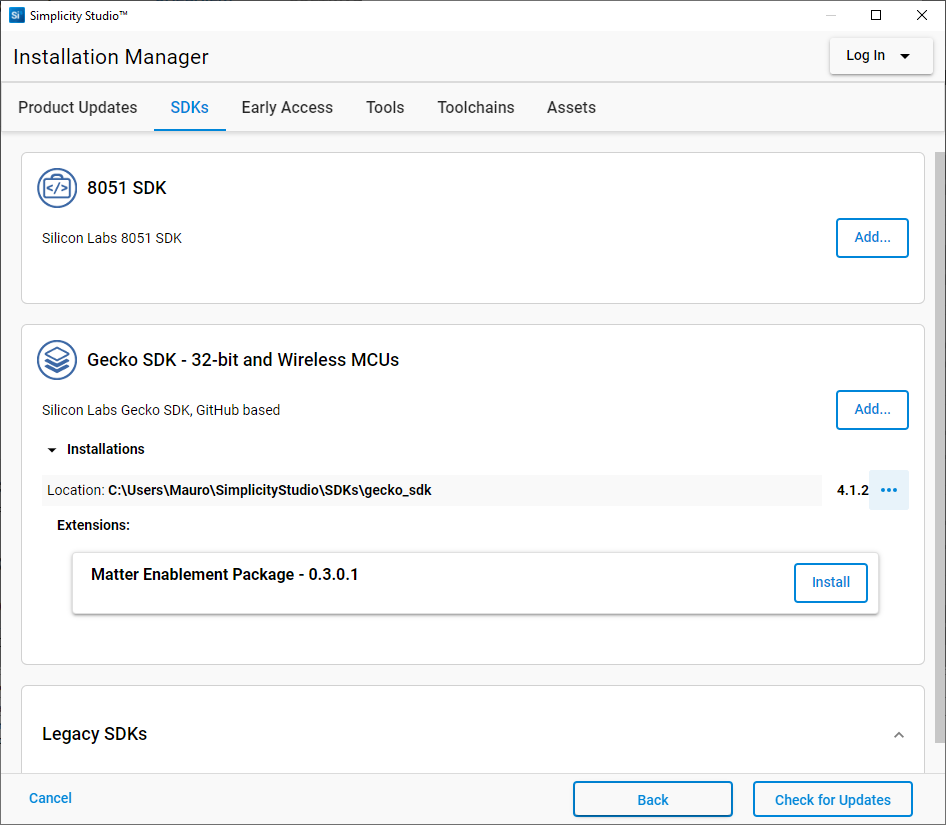
- In the drop-down menu, select SDK v.4.1.2 and hit "Finish".

- From the Launcher page, select "Thunderboard EFR32BG22" under "Debug Adapters" by double-clicking it.
- Under the "File" menu, select "Import" then "Browse" to C:\git\swl_periph\platform\efr32bg22_silabs_sdk_4\swl_bootloader.
- Select the (.sls) project type and press "Next".
- Edit the name to exactly "swl_bootloader" then click "Finish".
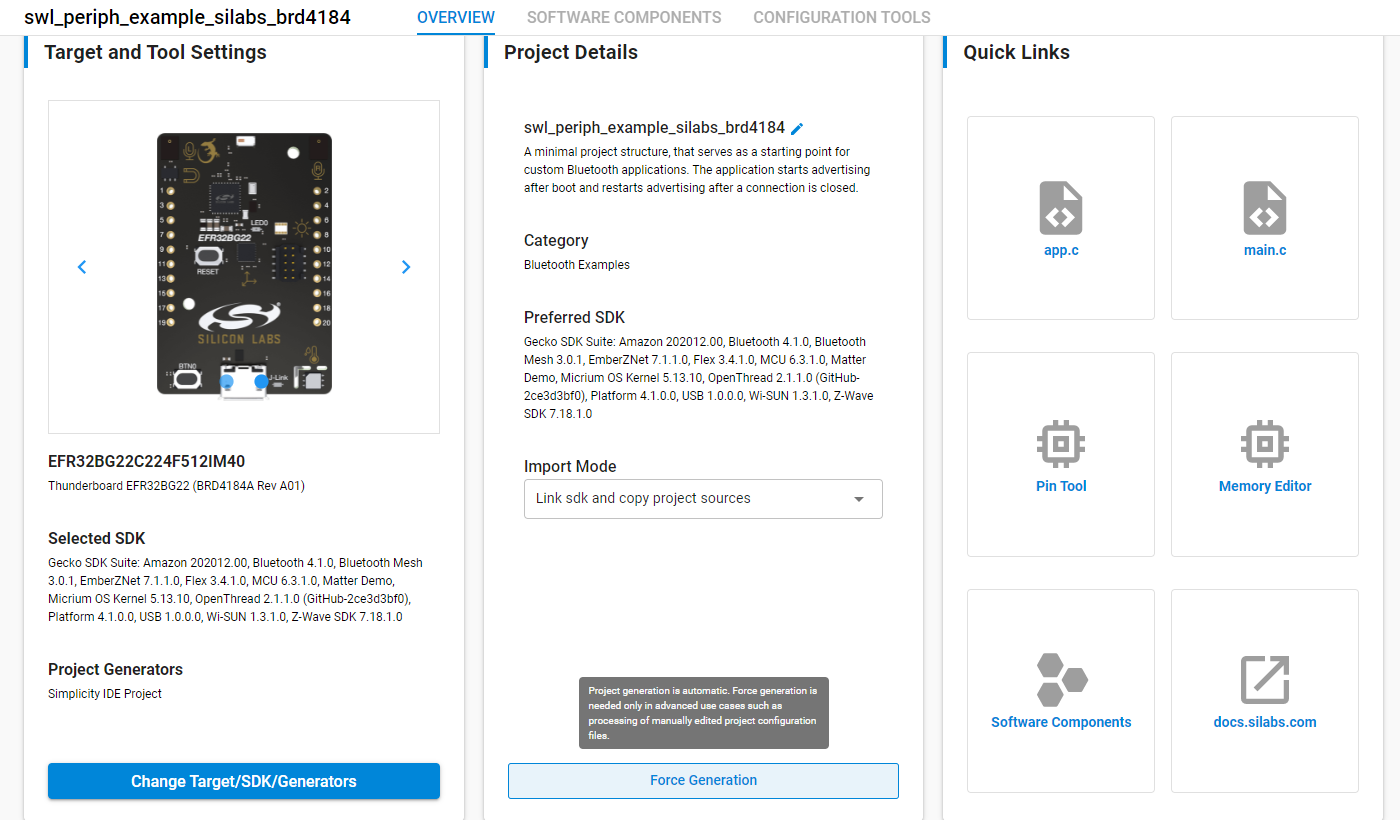
- Double-click swl_bootloader.slcp under the Project Explorer to open up the Overview page.
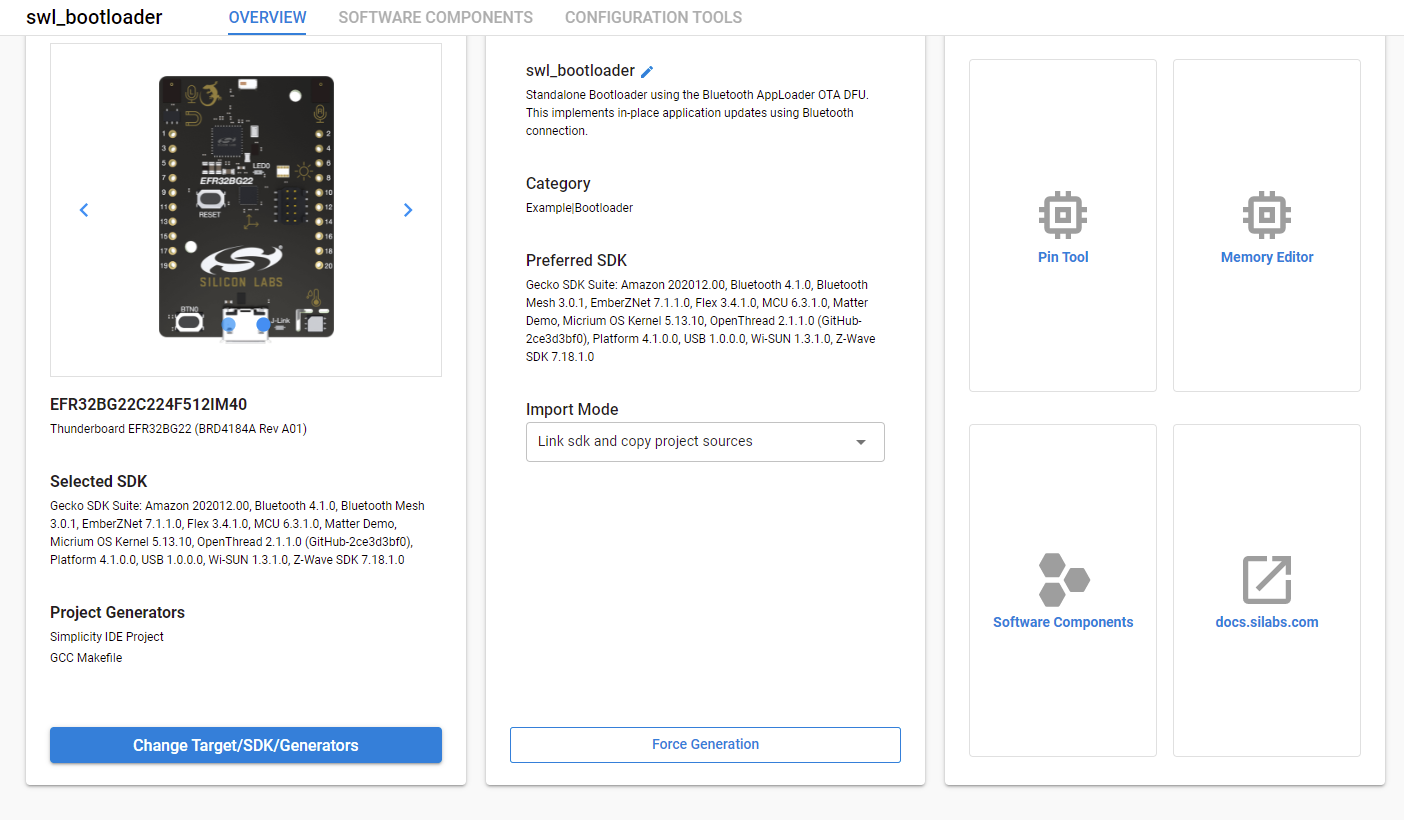
- If your DK is of version B, first click "Change Target/SDK/Generators" then select "Thunderboard EFR32BG22 (BRD4184B) and save the changes. Otherwise, skip this step.

- Click the "Force Generation" button in the Overview page under Project Details.
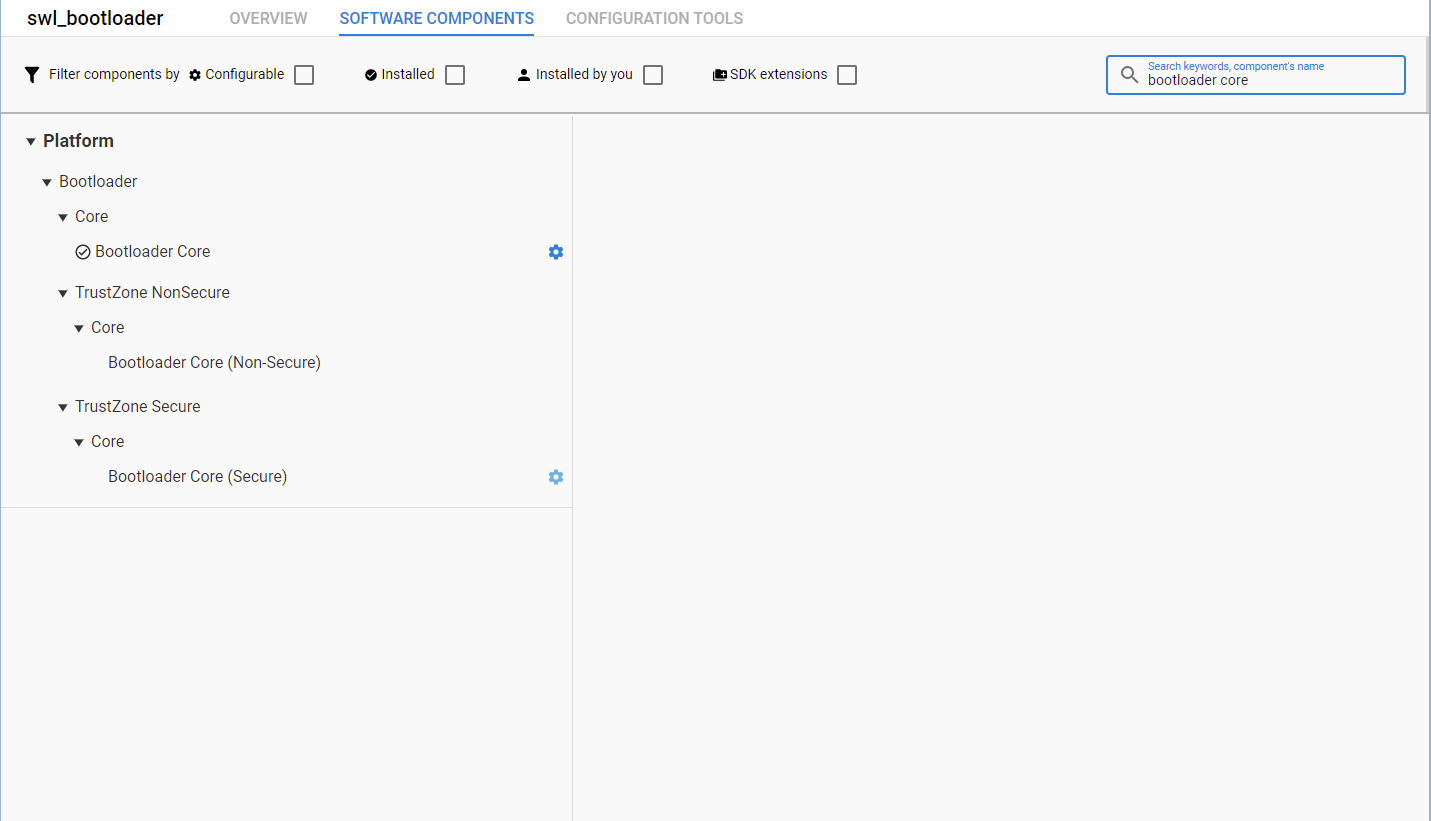
- Navigate to the Software Components page to the right of the Overview page.
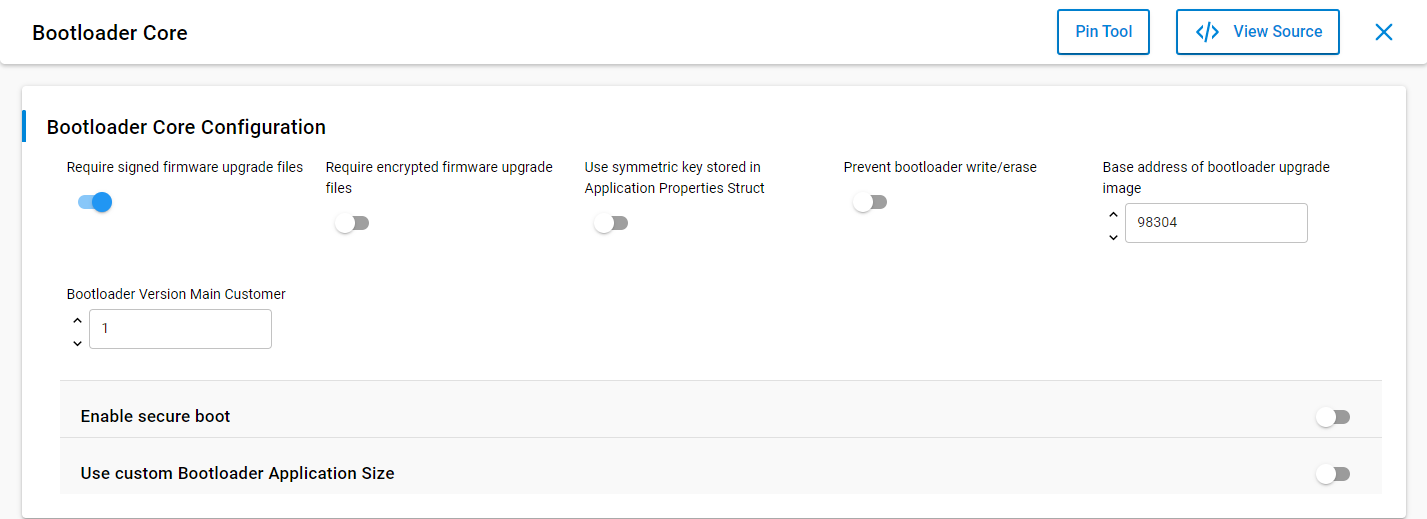
- In the top-right search bar type "bootloader core" and select the blue gear icon next to "Bootloader Core" to configure it.
- From the Bootloader Core configuration page, enable "Required signed firmware upgrade files".
- Now select the swl_bootloader project under the Project Explorer and build the project by pressing the hammer icon.
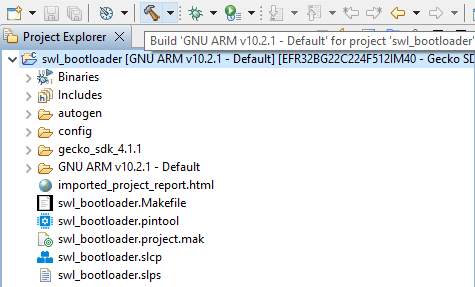
- Flash the swl_bootloader project by clicking the Debug icon.
- Exit the debugger by clicking the red square icon, the bootloader is now flashed onto the DK.

- Switch perspective by pressing "Launcher" at the top-right of the SSv5.
- Now, to import the SWL API, first go to "File" -> "Import".
- Click "Browse" and navigate to C:\git\swl_periph\platform\efr32bg22_silabs_sdk_4\swl_periph_example_silabs_brd4184.
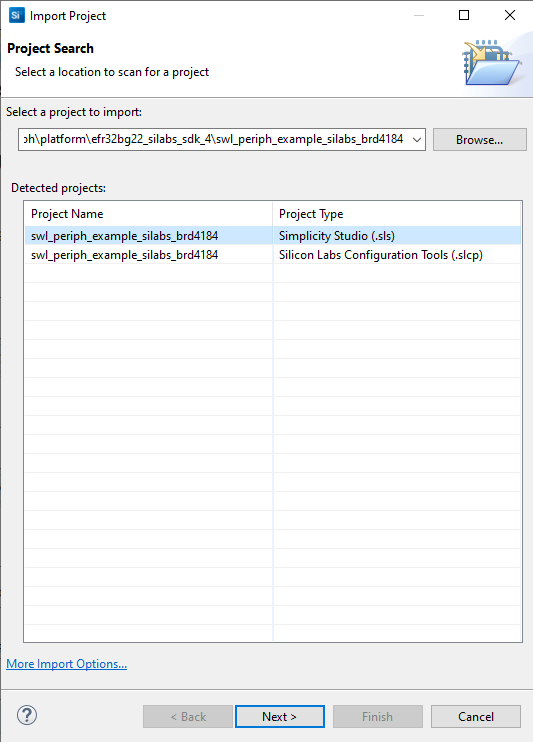
- Select the project with the (.sls) extension and click "Next".
- Before hitting "Finish" change the project name to "swl_periph_example_silabs_brd4184", by default it should appear as "swl_periph_example_silabs_brd4184_2".
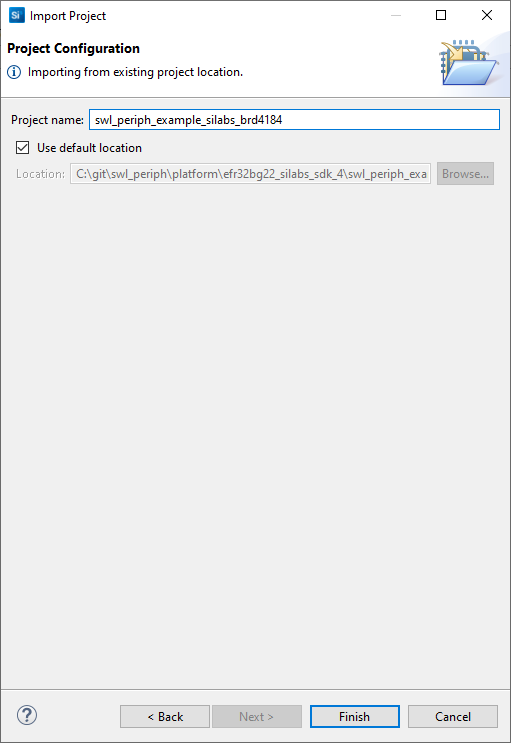
- Finish importing the project with all the default options.
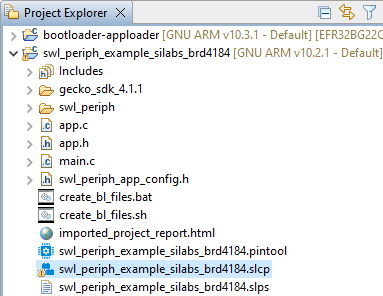
- Now, from the Project Explorer expand the swl_periph_example and double-click swl_periph_example_silabs_brd4184.slcp.
- If your DK is version B, then from the Overview page under "Target and Tool Settings" click "Change Target/SDK/Generators", select "Thunderboard EFR32BG22 (BRD4184B) and save the changes. Otherwise, skip this step.
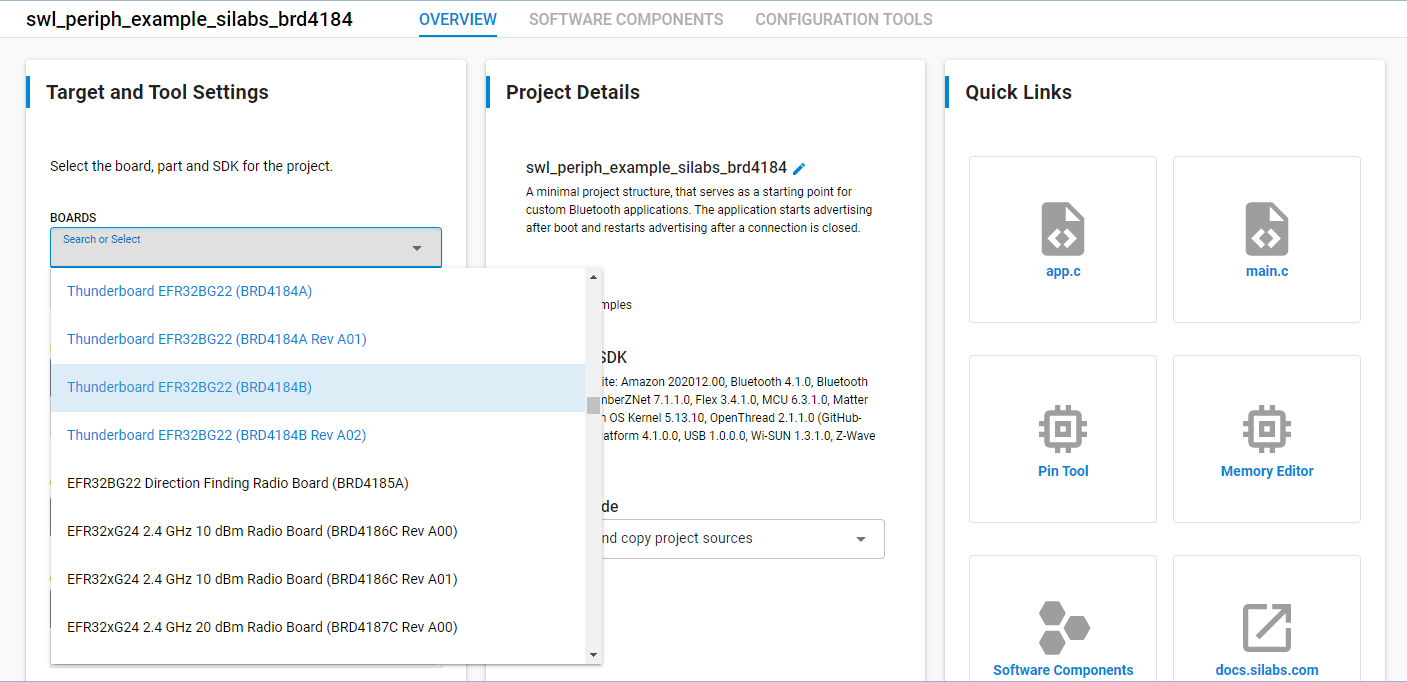
- From the Overview page, find and click the "Force Generation" button under "Project Details".
- After forcing generation, you may encounter this error however it is safe to carry on.
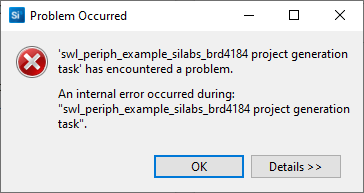
- Under the project explorer, locate the autogen folder, inside select "gatt_db.c" and go to properties.
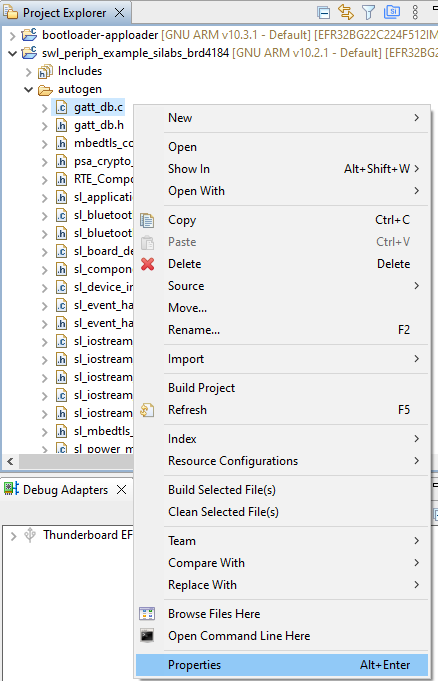
- Now click on C/C++ Build, check the "Exclude resource from build" box and select Apply and Close.

- Now navigate to the "swl_periph_example_silabs_brd4184" project properties. Go to on C/C++ Build -> Settings -> GNU ARM C Linker -> Miscallaneous and under "Other objects" select to edit the swl_periph library file.
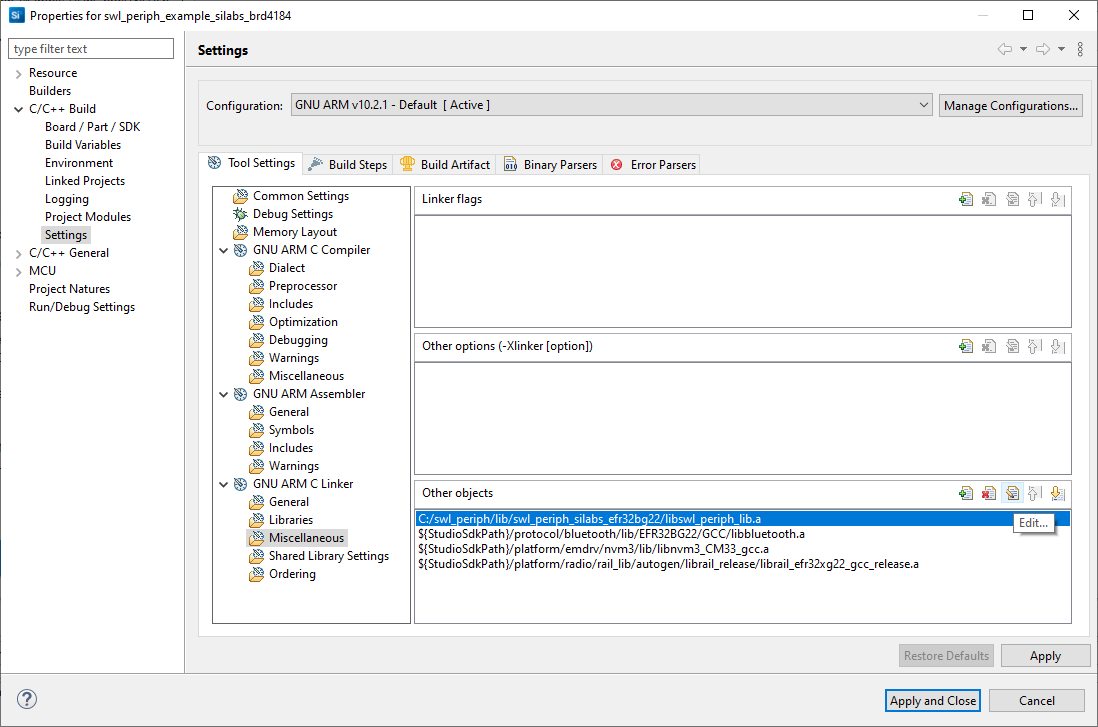
- Edit the file path to ${workspace_loc}../../../swl_periph/lib/swl_periph_silabs_efr32bg22/libswl_periph_lib.a and select OK.

- Lastly, select the "swl_periph_example_silabs_brd4184" project and follow the same build then debug procedure from the bootloader to securely build and flash the application onto the EFR32BG22 DK.
Project and Application Walkthrough
From Simplicity Studio 5 (SSv5), click on "Recent" in the top menu bar to load recent projects if contuining from the previous section. Alternatively, under the "File" menu select "Import". Click "Browse" and navigate to the following directory:
C:\git\swl_periph\platform\efr32bg22_silabs_sdk_4\swl_periph_example_brd4184.
From there, select the swl_periph_example (.sls) project file and and follow the same procedure from the Project Setup Guide above.
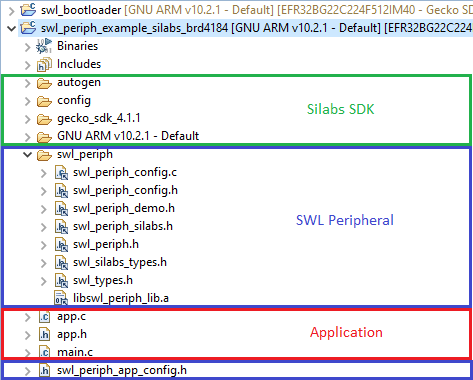
Upon opening the .sls file, SSv5 will update the Project Explorer with all project files which can be viewed. The project files can be separated into three basic categories: Application, SWL Peripheral, and EFR32BG22 SDK. For this walkthrough, the focus will be on the Application and SWL Peripheral files.
Under the Project Explorer in SSv5, navigate to the swl_periph_common group of files and open the swl_periph.h header file as well as app.c within the Application group.
Inside swl_periph.h you can become acquainted with the SwaraLink Embedded Peripheral (swl_periph) API. The key defined variable data types and function prototypes can be found here, along with detailed descriptions in the comments.
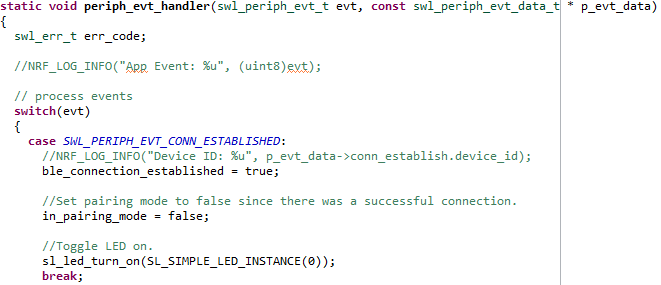
The peripheral events found in the enumeration swl_periph_evt_t define all of the possible events that can be generated by the middleware and that are processed in the application's event handler function (periph_evt_handler, found in app.c).
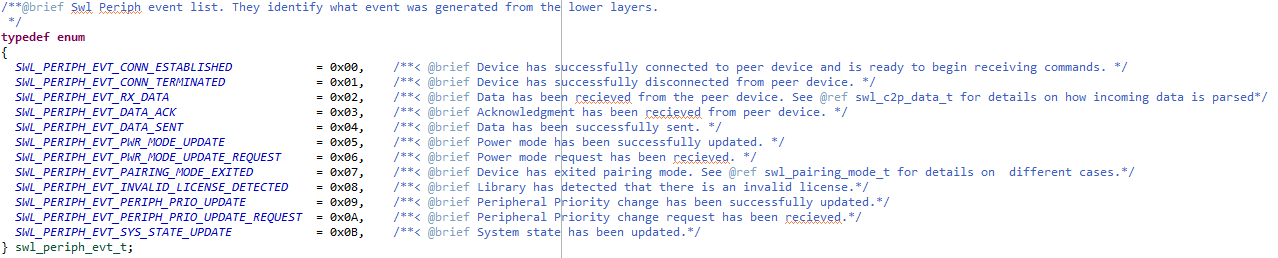
So for example: when a Bluetooth connection has been established between the peripheral and a central device (that is running the SwaraLink Mobile Central Middleware library, aka "SWLCentral"), the swl_periph library will generate a SWL_PERIPH_EVT_CONN_ESTABLISHED event identified by the value 0x00.
In addition to the event type, the peripheral event handler also includes a second parameter: a pointer to an swl_periph_evt_data_t object containing data associated with the event. As a union, the specific type of the data is dependent on the type of the event. So in the case of the library generating an SWL_PERIPH_EVT_CONN_ESTABLISHED event, the data object will contain a swl_conn_establish_t structure within it. The event handler will proceed to turn on LED 1 on the development kit (DK) to signal the newly connected state as well as set the boolean ble_connection_established variable to true.
Here are a few other examples of events that are generated by the peripheral library:
SWL_PERIPH_EVT_RX_DATA
- This event occurs whenever the peripheral device receives data from its central peer. In this case, the peripheral event handler will call the function handle_rx_data() with the swl_periph_evt_data_t union member, swl_c2p_data_t (SWL Central-To-Peripheral Data).

The swl_c2p_data_t struct holds the pertinent information for the incoming data, such as: major and minor headers, device ID, a pointer to the received data, etc. These data fields are used within the handle_rx_data() function to process the data if the major is set to the required major as specified by ID_HDR_MAJ_P2C_DEMO_REQ and one of few defined minor headers located within swl_periph_demo.h.
Drawing back to the EFR32BG22 demo, the major header that was utilized to usefully demonstrate SWLCentral.sendData in step 5 was 00, which is what ID_HDR_MAJ_P2C_DEMO_REQ is defined as.
- This event occurs whenever the peripheral device receives data from its central peer. In this case, the peripheral event handler will call the function handle_rx_data() with the swl_periph_evt_data_t union member, swl_c2p_data_t (SWL Central-To-Peripheral Data).
SWL_PERIPH_PRIO_UPDATE
- This event takes place when the peripheral device has successfully updated its priorities, as defined in the Terminology page. During this case, the event data object will contain the struct swl_periph_prio_updated_t which is composed of three variables of type swl_priority_t to identify the three updated priorities. The mentioned swl_priority_t is a simple enumeration containing the three possibile priorities to be chosen from, all found within our API in swl_periph.h.

The peripheral event handler goes on to log the updated priorities, accessed through the swl_periph_prio_updated_t type event data object.
- This event takes place when the peripheral device has successfully updated its priorities, as defined in the Terminology page. During this case, the event data object will contain the struct swl_periph_prio_updated_t which is composed of three variables of type swl_priority_t to identify the three updated priorities. The mentioned swl_priority_t is a simple enumeration containing the three possibile priorities to be chosen from, all found within our API in swl_periph.h.
SWL_PERIPH_EVT_CONN_TERMINATED
- This event is generated when the peripheral device successfully terminates the connection with its central peer. In this case, the union type swl_periph_evt_data_t event data object will contain the struct swl_conn_terminate_t which contains the device ID of the disconnected central. The event handler proceeds to clear LED 1 and the connection established flag, which were both set during the SWL_PERIPH_EVT_CONN_ESTABLISHED event discussed above.
Up to this point, we have discussed notable data types and how they are utilized by the peripheral event handler to process the data as defined by the corresponding event. The logic to process these different events is greatly comprised of SWL API functions whose prototypes can also be found in swl_periph.h. The following are a few function examples:
swl_periph_p2c_tx_by_copy()
- Use this function to queue a peripheral-to-central transmission executed by directly copying the data into the transmission buffer.
- Does not require that the data being sent is preserved by the application, as it is replicated into the buffer.
- Accepts a pointer to the data, the length of the data, boolean variable to request an acknowledgement from the central, a major ID, and a minor ID.
- Returns swl_err_t as: SWL_SUCCESS, SWL_ERR_INVALID_PARAM, SWL_ERR_INVALID_SIZE, SWL_ERR_INSUFFICIENT_MEMORY, SWL_ERR_INSUFFICIENT_BUFFERS, or SWL_ERR_CRITICAL.
swl_periph_p2c_tx_by_ref()
- Use this function to queue a peripheral-to-central transmission executed by using a reference to the data in your application for the transmission buffer.
- Requires that the data being sent is preserved by the application until the SWL_PERIPH_EVT_DATA_SENT event is generated, as any change in the data will be referenced to while queued or during operation.
- Accepts a pointer to the data, the length of the data, boolean variable to request an acknowledgement from the central, a major ID, and a minor ID.
- Returns swl_err_t as: SWL_SUCCESS, SWL_ERR_INVALID_PARAM, SWL_ERR_INVALID_SIZE, SWL_ERR_INSUFFICIENT_MEMORY, SWL_ERR_INSUFFICIENT_BUFFERS, or SWL_ERR_CRITICAL.
swl_periph_set_peripheral_priorities()
- This function can be called to set what will be prioritized by the peripheral device; between power consumption, data throughput, and communication range.
- Accepts three swl_priority_t type variables that indicate highest, second highest, and third highest priorities.
- Returns swl_err_t as: SWL_SUCCESS or SWL_ERR_OPERATION_IN_PROG.
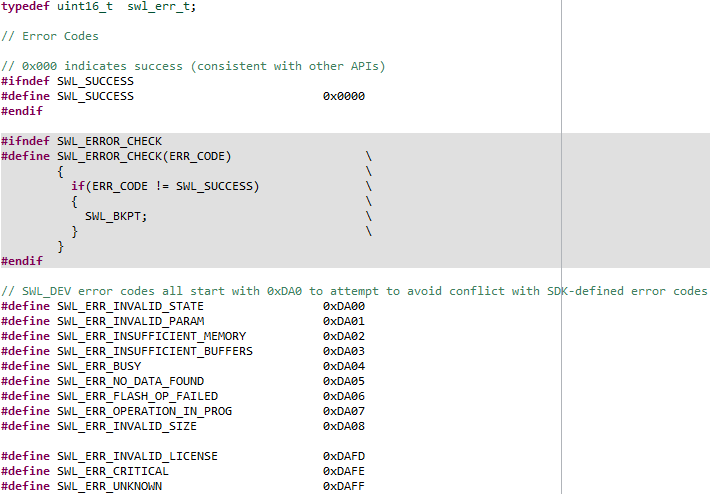
The swl_err_t and the error codes belonging to it are defined in the swl_types.h file.
Another key feature of the SWL API is the exception handler function (exception_handler, found in main.c). This handler gets called whenever an error is caught in the peripheral library with a pointer to a struct of type swl_periph_exception_data_t, containing information to do with the origin of the exception in the code as well as metadata generated by the exception. Like all other API data types, this struct is defined in swl_periph.h.
The exception handler proceeds to log the precise location in the code where the exception occured as well as its metadata. After logging the contents of the exception data struct, the log is then dumped to save and identify the state of the code when the exception occured. This dumped diagnostic log should be reported to SwaraLink for further analysis on the peripheral platform. Lastly, the exception handler triggers a breakpoint if the debugger is connected, otherwise it proceeds to reset the CPU.
One more header file worth reading is swl_periph_app_config.h in the Application directory. Here, we define peripheral application parameters such as the transmission buffer size and the intial peripheral priorities.
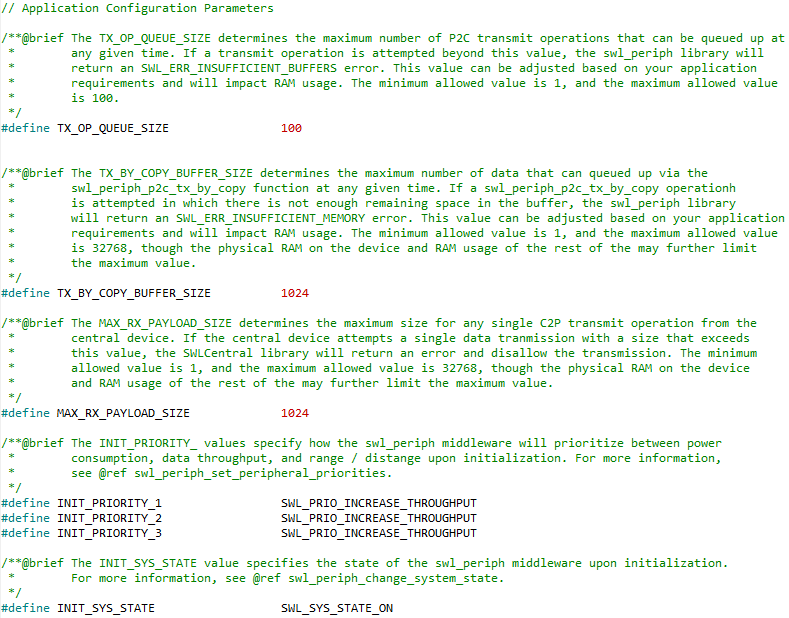
Note that the initial priorities are all set to increase throughput, which was observed in the demo documentation when first connecting the SWLCentral mobile device and the peripheral DK. Initially, we recommend you do not modify these values until further familiariziation with the platform.