Setup Swaralink Library in Android
This walkthrough will help you set up the Swaralink BLE Platform middleware for development on Android. The following section will provide step-by-step detail on the instructions to get the SWL Central library ready for custom mobile integration with the Android framework.
Get a hands on experience with a working Android application using the SWL Central library by downloading the SWL mobile app on the Google Play Store.


Then visit the SWL Github page to checkout the Android app source code and see a fully working mobile example.
Note: To complete the full build process, you will need to obtain the SWL Central library from Swaralink Technologies. The library will be provided upon execution of a license agreement with Swaralink Technologies. For more information on obtaining a license, please contact swaralink Technologies at info@swaralink.com.
In the meantime, feel free to go through the remainder of the setup and application guide to understand the process of building a project and to get a walkthrough of the code. You can also browse around the SwaraLink Demo project source code and take a look at our API in the header files.
1. Install Android Studio
First, install Anroid Studio 4.2.1 or later.
2. Download the Required Android SDK
Next, download the Android SDK (Android 8.0 / API Level 26) or later.
3. Project Setup on Android Studio
Within Android Studio, open your target project and change the project folder structure from 'Android' to 'Project'.
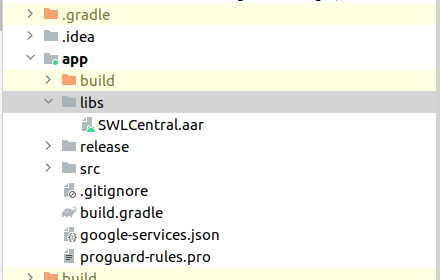
4. Drop in the Swaralink Central Library
From here, search for the directory libs inside the app module. If no such directory is found, create a directory titled libs in the app module. Then paste the SWLCentral.aar file inside the created directory.
5. Sync the Project
Navigate to, File -> Sync Project with Gradle Files and enable this option to sync your Android Studio project moving forward.
6. Add the Required Dependencies
Now, open the build.gradle(:app) file and add the code lines below to the project dependencies.
dependencies {
  ..
  implementation files('libs/SWLCentral.aar')

  implementation 'com.google.android.gms:play-services-location:21.0.1'
  implementation 'no.nordicsemi.android:dfu:2.2.0'
  implementation 'no.nordicsemi.android:mcumgr-ble:1.4.1'
  ..
}
7. Configure the Use of Java Version 11
In the target project, configure the utilization of Java Version 11 by default. To do so, in your build.gradle(:app) file add the following lines of code:
  android {
    ..
    compileOptions {
      sourceCompatibility JavaVersion.VERSION_11
      targetCompatibility JavaVersion.VERSION_11
    }
    kotlinOptions {
      jvmTarget = JavaVersion.VERSION_11.toString()
    }
    ..
  }
Before moving on, click on "Sync Now" then proceed to the following steps.
8. Set the Application Context
In your Application class, add the following line within the onCreate() method call for the BLE Manager.
BleManager.getInstance().init(applicationContext)
Now you can create the BleManager object using the getInstance() method and any API in the library can be used by chain calling the object. For example:
BleManager.getInstance().discoverAndConnect(__ , __)
9. Keep Track of Library Log Events
Create a reference of the ConnectionEventListener class in order to access and trace the log events output by the library.
val listener = ConnectionEventListener()
10. Enable Mobile Location Services
Ensurer that your phone location settings are enabled for the library to be fully functional. Alternatively, you can enable the feature programatically from the app.
All set and ready to commence using the library in your Android Studio projects.